Lego Car & Raspberry Pi
Monday, 20 January 2014
For awhile I’ve wanted to connect an RC car to the Raspberry Pi by wiring up to a Tyco Fast Traxx remote control. There are even products like Pi-Cars now, and entire blogs devoted to the construction of autonomous cars. I decided to build out a similar concept with the help of my kids (read about the last time we posted on lego cars).
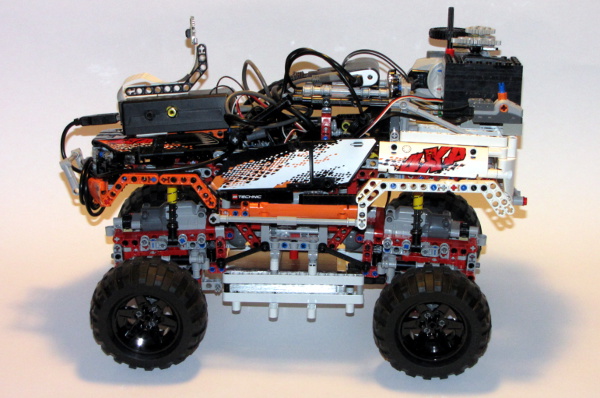
Recently we acquired the Lego 4×4 Crawler, which includes:
- (2) Large Motors – to drive the wheels
- (1) Servo Motor – for turning
- (1) Battery Box – to power the native Lego parts
- (1) Infrared Remote Control
- (1) Infrared Receiver
After they completed the Lego build instructions, they added:
- (2) Lights – as headlights
- (1) Control Switch – to turn the lights on or off
This provided an opportunity for me to control the 4×4 Crawler’s infrared remote with a Parallax servo and Lego gear attached to the Raspberry Pi.


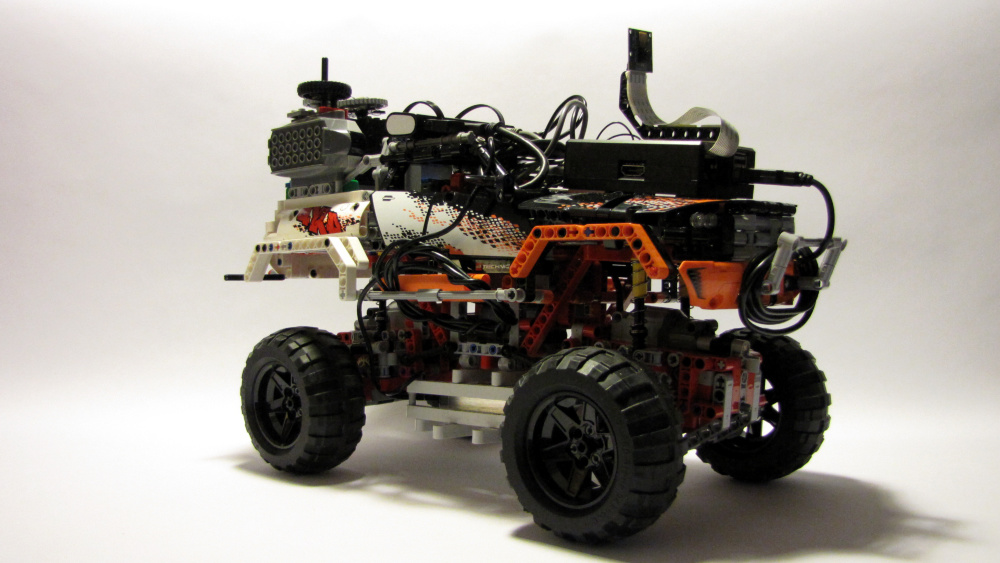

The Parallax Standard Servo was attached with Lego bricks built around the outside of it and a larger Lego gear wired on top of it. I then built a platform in the bed of the 4×4 for space to hold this custom part, as well as the connecting gear, and Lego Infrared Remote Control.
To distribute the weight a little bit, the USB battery was enclosed on the underside of the vehicle. As you can see in the video at the end of the post, it still runs lopsided at times. When turning it on, the only thing it directly powers is the USB hub on top. The USB hub then powers the Raspberry Pi, servo, and other peripherals.
Parts used:
- (1) Raspberry Pi
- (1) Raspberry Pi Camera Board
- (1) Parallax Standard Servo
- (1) 802.11N USB Adapter
- (1) Bluetooth Game Controller
- (1) 4-port Powered USB Hub
- (1) 7800 mAh USB Battery
- (1) 16 GB SD Card
- Male Jumpers and Female Jumpers
- Miscellaneous parts like spare USB cables, electrical tape, and cable ties
Although the servo in the project was wired to the USB hub, the illustration below shows how the USB battery can power the servo, as well as how the control wire is able to be connected up to BCM_GPIO pin 18 for testing.
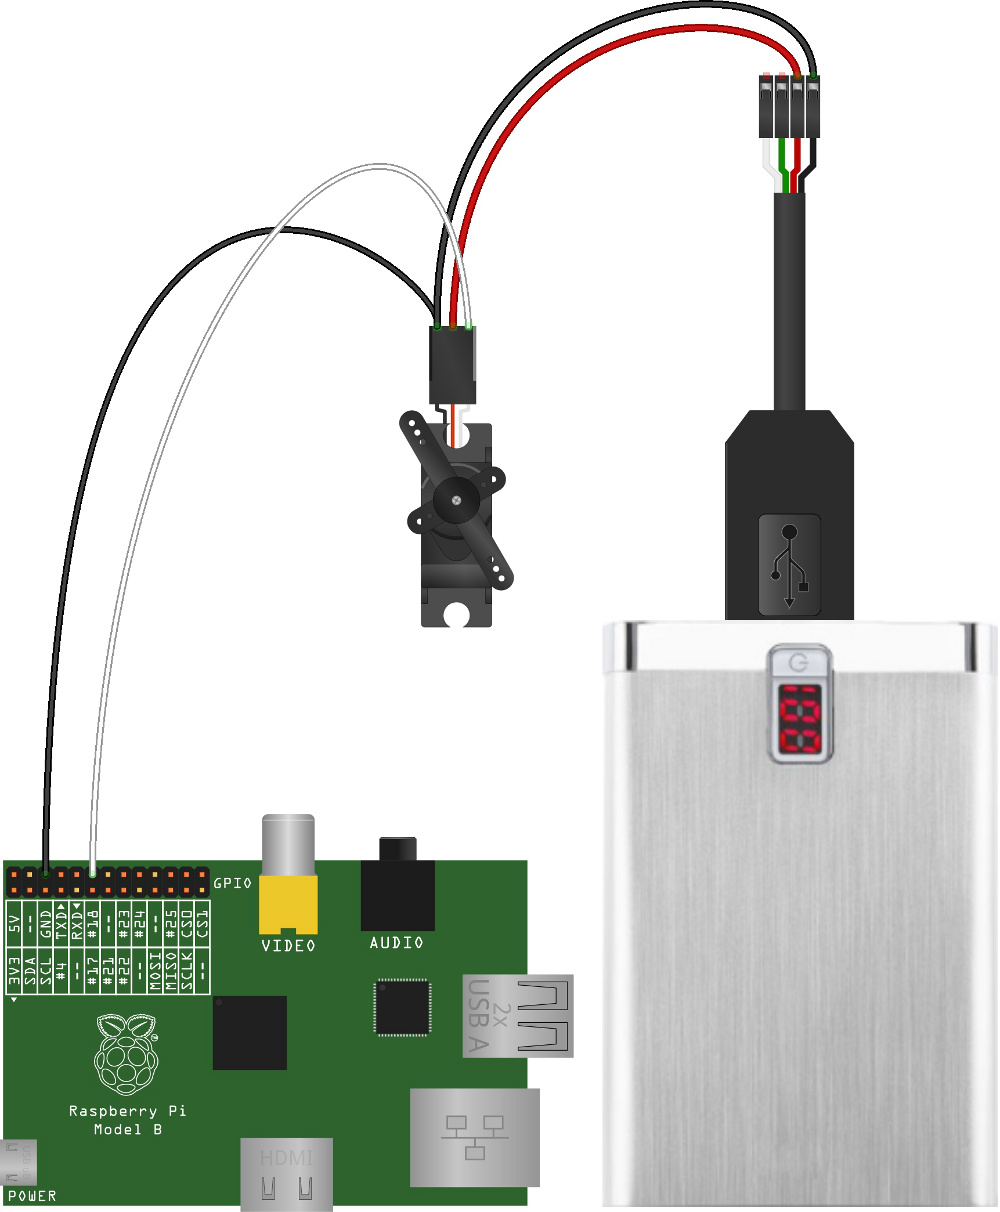
example wiring showing how to run the servo from external battery
For issuing the commands remotely, I had in mind to hook up a Bluetooth USB adapter and pair the Bluetooth game controller directly to the Pi, but in the interest of simplicity, I paired it with my Nexus 4 instead and ssh’ed into the Pi using Terminal IDE.
Using a wireless keyboard I launched the listener script for the servo and was able to control it using the arrow keys. The Bluetooth game controller worked flawlessly as the buttons mapped to standard keyboard codes I specifically looked out for in the script.
listener.sh
#!/bin/bash
ENTER=$(printf "%b" "n")
ESCAPE=$(printf "%b" "e")
UP_SUFFIX="A"
RIGHT_SUFFIX="C"
LEFT_SUFFIX="D"

while true; do
  read -sn1 a
  case "$a" in
    $ENTER) echo "ENTER";;
    $ESCAPE)
      read -sn1 b
      test "$b" == "[" || continue
      read -sn1 b
      case "$b" in
        $RIGHT_SUFFIX)
          echo "Turning Right"
          ~/right.sh
        ;;
        $UP_SUFFIX)
          echo "Straigtening"
          ~/straight.sh
        ;;
        $LEFT_SUFFIX)
          echo "Turning Left"
          ~/left.sh
        ;;
        *) continue;;
      esac
    ;;
    "d")
      echo "Turning Right"
      ~/right.sh
    ;;
    "w")
      echo "Straigtening"
      ~/straight.sh
    ;;
    "a")
      echo "Turning Left"
      ~/left.sh
    ;;
    "3")
      echo "Taking a picture"
      ~/picture.sh &
    ;;
    "4")
      echo "Taking a video"
      ~/video.sh &
    ;;
    *) echo "$a";;
  esac
done
When the various buttons or keys are pressed, the listener script calls out to the other scripts, which provide for turning, picture, and video taking.
picture.sh
#!/bin/bash
dateTime=`date +%Y-%m-%d-%H-%M-%S`
pictureDirectory=~/pictures

raspistill -w 640 -h 480 -e jpg -t 0 -o $pictureDirectory/$dateTime.jpg
video.sh
#!/bin/bash
dateTime=`date +%Y-%m-%d-%H-%M-%S`
videoDirectory=~/videos

echo "Taking a video for 10 seconds"
raspivid -t 10000  -o $videoDirectory/$dateTime.h264
right.sh
#!/bin/bash
sudo ~/control.py 1100 .25
straight.sh
#!/bin/bash
sudo ~/control.py 1300 .25
left.sh
#!/bin/bash
sudo ~/control.py 1550 .25
The turning scripts all make use of RPIO.PWM which I was able to use after installing RPIO and building off of the provided examples.
control.py
#!/usr/bin/python
import time
import sys
from RPIO import PWM

servo = PWM.Servo()

#appropriate range of values for BCM_GPIO pin 18 and the servo: 370 - 2330

print servo.set_servo(18, float(sys.argv[1]))

time.sleep(float(sys.argv[2]))

servo.stop_servo(18)
Though the Raspberry Pi camera module is rated 5 megapixels with a native resolution of 2592×1944 I have it statically set to 640×480 in the picture taking script above. With it, I was able to capture a picture of my cat ignoring everything but the treat we were bribing her with.

And another one, when she had realized something was going on.

Lastly, I put together a short video of the Lego 4×4 Crawler being driven from the outside as well as a first person perspective clip from the Raspberry Pi camera.
